Hi,
In the last email, I introduced you to the figure 8 lesson.
In that setup with a mat and two cones, you ask your horse to go around a cone, land on the mat, change direction and go around the opposite cone.
This creates beautiful turns and establishes your cues to send your horse out and to invite him back in.
We add two more cones in the following lesson, keeping the mat in the center.
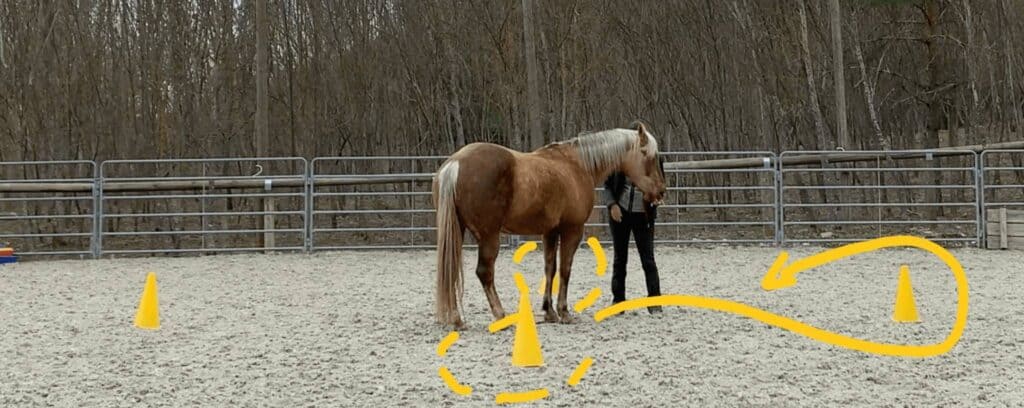
Lesson 5: The Double Figure 8
You set out the cones in four directions, N, E, S, and W, with an equal distance to the mat.
This pattern allows more CREATIVITY.
For starters, you send out your horse to go around the cone, he comes back to the mat, you change sides and send him around the opposite cone.
Assuming your horse executes perfect turns, you would continue in a figure eight. Then you don’t need the additional two cones, right?
Yes, but we will shake things up a little bit and include small balance shifts.
In a standard “Grown-ups are talking, please don’t interrupt” lesson, you click your horse for standing evenly on his four feet with his head and neck straight out in front of him. And that’s where you feed. Then, as you ask for a step forward, he steps off the mat in a straight line.

If you want him to step around the cone that is to the side, instead of the one that is straight ahead, you click as before for “Grown-ups,” but then you present the food in a way that your horse turns his head in a counter-flexion away from you. This shifts his balance slightly to allow him to reach the cone that is to his side.
You may remember this technique from Email #4.
There are actually a lot of details to that (as usual). You want to avoid that he tilts his head (i.e. the tips of his ears should be on a horizontal line), the position where you feed should be comfortable for him and not too low (which would shift his weight on the shoulders resulting in an unbalanced step off the mat), and he should not push through you to get to the mat.
Note: there is another great lesson to work on all these details. Remind me to explain it in a dedicated email.
Here’s a short video of what this lesson looks like. You will see both turns: straight to the next cone or off to the side.
In the lesson coming up next, we put all the pieces together to create liberty lunging.
Until then,
Happy training,
Michaela